Installation of CVRTA: CV Rich Text Area on Activities
Steps to Install:
Remember you can always ask us to get on a call to set your app in Sandbox and Production. Just email to apps@cloudvandana.com

Note: We recommend installing the app in the sandbox first and then install in production if everything looks fine.
- Once you are presented with the installation screen, you are required to select which of your users should be granted access to the app including all its components.
Most customers should select the middle option “Install for All Users”, which will ensure that all users have the proper permissions should they be assigned a license in the next step.
Click the Checkbox as shown to Acknowledge your installation.

Once you make your selection, click the Install button.

Once the installation is complete, click the Done button to return to your Salesforce org. You may see a message stating that the installation is taking a long time to complete. In this case, you will receive an email once the installation finishes.

Now CVRTA is Installed in your System.
You can verify the same in the installed packages. From Setup, Search Installed Package and Click “Installed Packages” to view.

Enable My Domain – Pre-Requisite
My Domain is a Salesforce feature that lets you highlight your brand, makes your org more secure, and allows you to take advantage of some new features of Salesforce like Lightning Pages, the Lightning App builder and, what we are interested in most, Lightning Components.
The easiest way to see if you have My Domains enabled is to log into Salesforce and look at the address bar. If you see something like https://yourcompany.my.salesforce.com, then you are all set and can skip to the next step. However, if you see something like https://na31.salesforce.com, you do not currently have My Domain enabled and need to take a few extra steps first.
For more details, watch a demo of My Domain or review the My Domain module on Trailhead.
Add Visualforce pages to Lightning Record Pages
CVRTA visualforce pages need to be added on the lightning record pages to create New Task and Log a call with Rich Text Area.
Steps to Configure:
- Open any Record in the Salesforce. We will take an example of Opportunity here.
- From the detail page of the opportunity, Click the gear icon at the top right corner, select Edit Page to open the Lightning App Builder.

- Click on the Tabs Page and Click on the Add Tab to add a new tab. Select custom from the dropdown for Tab Label and add the custom label as “New Task” or “New CV Task”. You can give any custom label as per your business requirement.
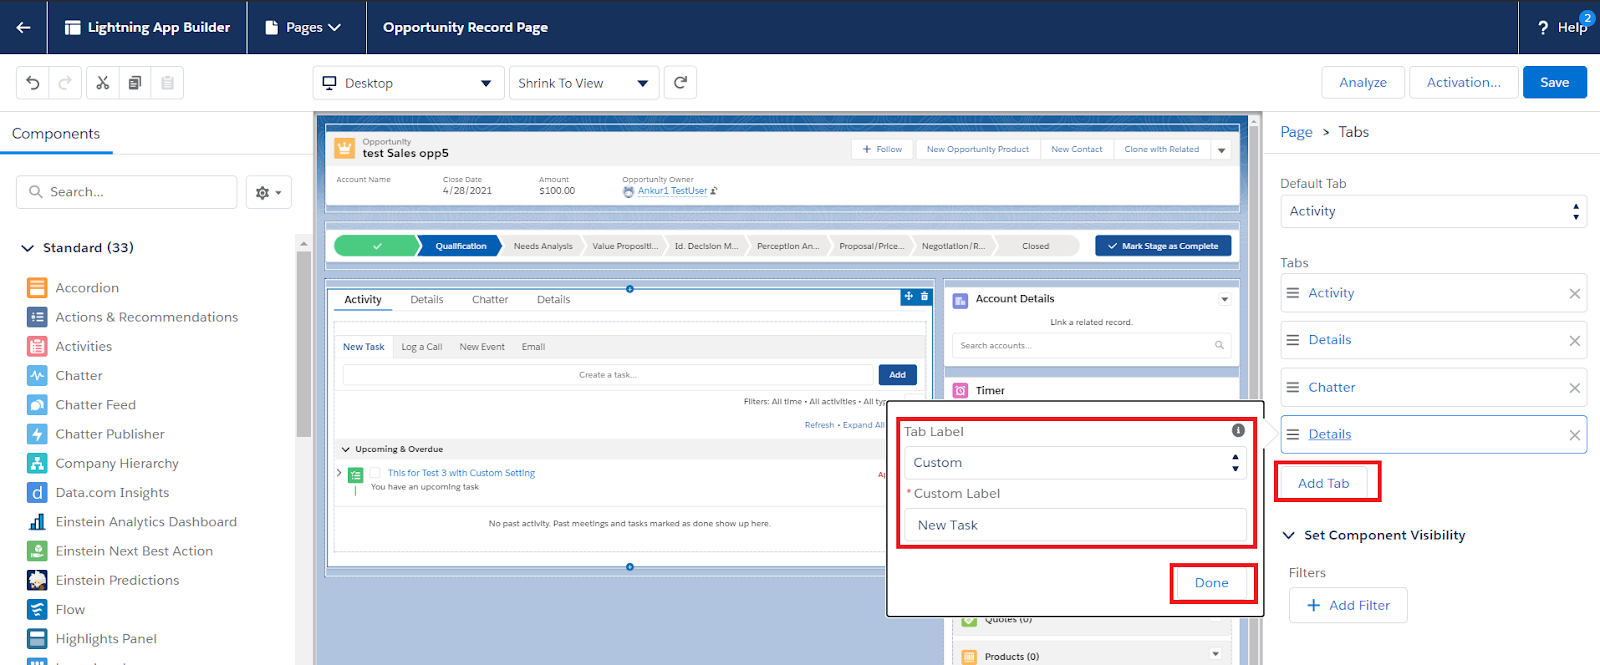
- Click on Done.
- Click on the Newly Created Tab “New Task”. You will see Add Component(s) Here message.
- Search for Visulaforce in the standard component from the left toolbar and drag the visualforce component to the center of the new tab.

- Search CVRT in the “Visualforce Page Name” search box and Select CVRT New Task.
- You can show or hide the label by checking/unchecking the “Show Label”. Enter text in the label in case you want to add Custom Label for the CVRTA New Task. Here we checked the show label and kept the custom label blank hence it is showing the name of the component by default.
- Optionally you can drag and drop this visualforce page on any region and tab of the Lightning record page as per your business needs.
- Once the page is configured. Click on the Save button on the top right.
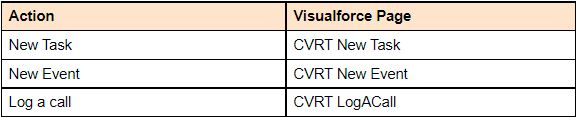
- Please repeat the above Steps to add a New tab for ”New Event” ,“Log a Call” and Add Visualforce component with Visualforce page name as “CVRT New Event” and “CVRT LogACall” respectively as shown below.
Log A Call

New Event

Add Visualforce pages to Task Record Page
CV Rich text area component is also visible on the task detail page so that you can keep your notes updated with rich text without any hassle.
Steps to Configure:
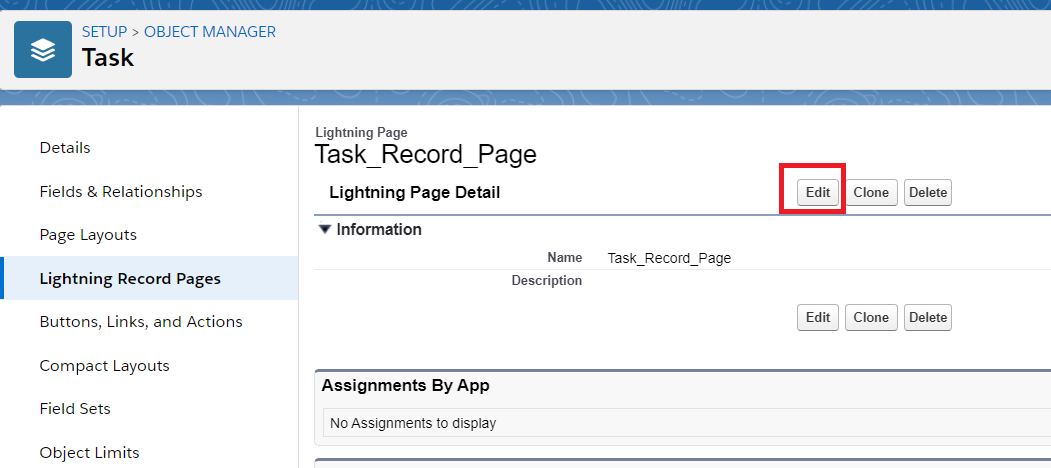
- From the Setup menu on a Task record page, select Edit Page. Or From Setup go to Object Manager. Search Task and click on the Task.

- Click on Lightning Record Pages from the Left and click on the Task Record Page.

- Click on Edit form the Task Record Page.
Note : If you do not find any Lightning Record Page for the Task. Please create a new record page for the task by the help of this link https://help.salesforce.com/articleView?id=sf.lightning_app_builder_customize_lex_pages.htm&type=5
- You will be presented with the screen below.

- Now, Search for Visualforce from the Components Search option.
- Click on Details Tab. Drag and Drop the Visualforce Component from Left to the bottom of the detail tab.
- Enter Visualforce Page Name as “CVRT Task Detail”. Show/Hide label by Checking/Unchecking the Show Label checkbox. Enter Label to customize the label name els it will display default label as “CVRT Task Detail”
- Once Configured, Click Save.

- Repeat the above steps to Add the CV Rich Text component on the Event Record Page. Use “CVRT Event Detail” in the Visualforce Page name for the Events.
Add quick action on Task and Event Page Layout
You can also edit CV Rich Text from Activity Timeline using the task dropdown quick actions.
Steps to Configure:
- From Setup go to Object Manager. Search Task and click on the Task.
- Click on Page Layouts, and click on Task Layout to edit.

- Click on Mobile & Lighting Actions from the available option on the Top. Clock on Edit CV Rich Text.
- Drag and Drop Edit CV Rich Text to the “Salesforce Mobile and Lightning Experience Actions”.
Note: If the Salesforce Mobile and Lightning Experience Actions section is disabled click on the gear icon on the right to enable the action buttons.

- Click Save.
- Repeat the above steps to add the quick action to the Event Page layout. Use “Edit CVRTA Event” action and add to the Event page layout.
Optional Configuration
Add Activity Comments for Reporting
Copy CV Rich Text content to the task comments field. This is helpful for the reporting purpose or to show comments in the Activity Timeline. Content copied to the comments will be converted to the plain text as comments do not support any formatted text (rich text).
Steps to Configure:
- From Setup , Go to Home
- Search Custom Setting in the quick find search.
- Click on Custom Settings
- Click on Manage for the CV Settings

- Click on New button to add new record
- Enter Name as “Create Comment” and keep the Create Task Comment as checked. (Note : You can uncheck later if you no longer need to copy CV Rich Text content to the Task comments)

- Click Save.

Important : Name should be exactly the same as “Create Comment” and is case sensitive.
Customize fields on the New Task and Log a Call
In our App we have provided options to include/exclude the Task fields from the CVRT New Task and CVRT Log a Call pages. These pages will be available on the Lightning Record Pages as per your configured location.
Steps to Configure:
- From Setup go to Object Manager. Search Task and click on the Task.
- Click on the Field Sets.

- Click on CVRT New Task Field Label to edit the fields for New Task
- Now you have options to add new fields and remove any default fields. Drag and drop Fields from the available fields to In the field sets.

- You can adjust the order of fields by simply drag and drop.
- To remove the default fields. Click on the Field from the Field Set and click on (-) as shown below.

Important : Please make sure you include all the required fields else the task creation might get failed if default value is not set.
- You can repeat the same steps to include/exclude the Task fields on the CVRT LogACall page.
- You can also edit the fields on the New Event by editing the field set “New Event” on the Event Object.

Cheers! Your app is ready to use.
For any assistance with this process, send an email to “apps@cloudvandana.com” and we can help!
Please refer this link to install and Configure the CVRTA: CV Rich Text Area on Activities
With the CVRTA app you can add Rich Text content on a Task and this RTA ( Rich Text Area) component will be available as New Task, Log a Call quick actions and also available on the Task Detail Page.
Create New Task, New Event or Log a Call
Your Salesforce Admin has to configure the CVRTA first to add required components on the RecordPages from where you will add a New Task, New Event or Log a Call associated with that record. This component can be used from any Standard or Custom object.
Let’s take an example of Opportunity
Go to opportunity Record and Click on the New Task or Log a call tab as shown below.
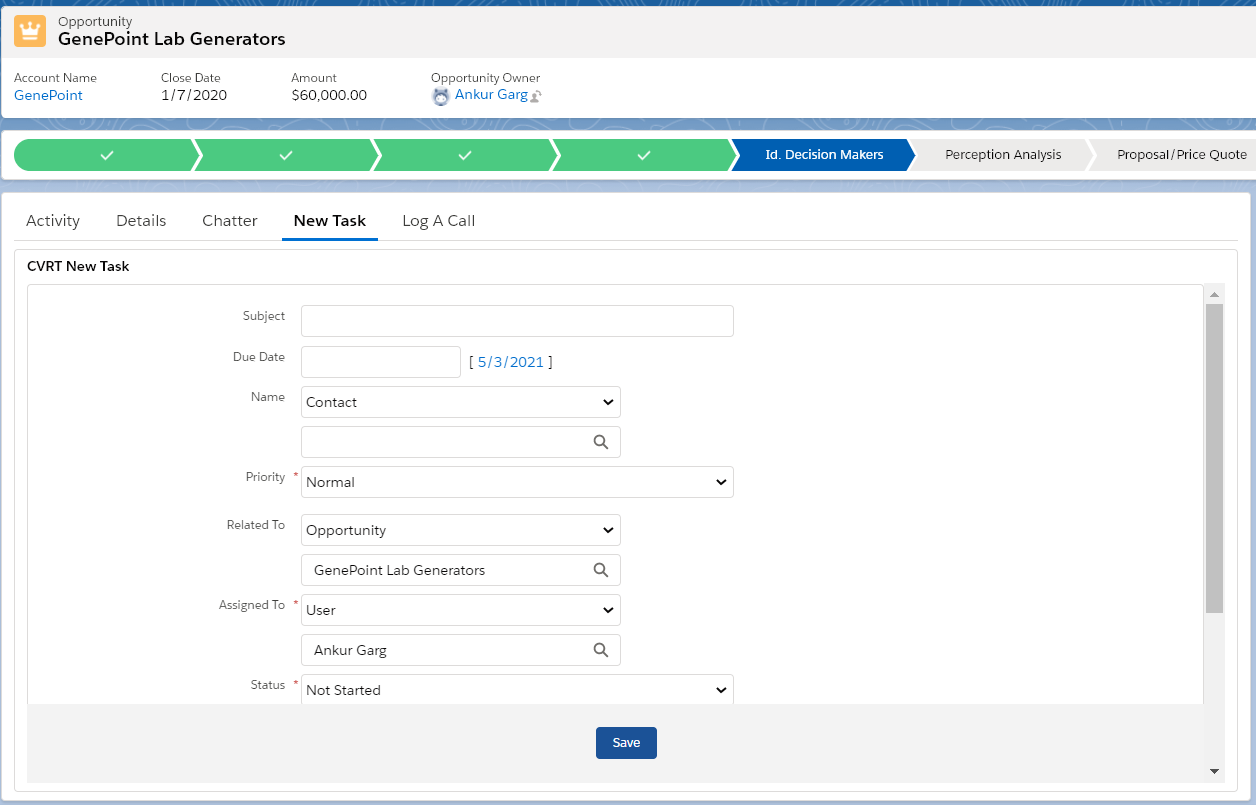
Enter the required information in the fields
Scroll down to the component to add Rich Text Content.
You can generate the rich text using an inbuilt toolbar which is very intuitive to use just like you add format to your word document or excel or you can simply copy paste the rich text content( that may include formatted text, tables, links, bullets etc.)

Hit Save.
Your Task will be created and automatically gets associated with Related Opportunity and if you refresh your Activity Timeline it will be visible there as well.

From Activity Timeline you can expand the Task to see the description of the task in the plain text format that you just added while creating New Task. CVRTA will capture the Rich Text Content to the standard Task comments/description to give more visibility in standard reporting and activity timeline.

Edit Task created with CVRTA
You can click on the subject to visit the task and view task details along with Rich Text Content. You can make further edits to the notes you just created with Rich Text and save right from the task detail page.

Click on Edit Button to add/modify the content and once done click save to reflect the changes on the Task details page as well as comments.

Activity Timeline changes

You can also edit the content of CV Rich Text using dropdown action available right from the Activity timeline without navigating to any other page. This saves time and allows you to take rich text notes on the go.
Click on the dropdown button available on the right of the Task and click on Edit CV Rich Text.

Pop-up will be presented on the screen on click of Edit C Rich Text. You can modify the text and save the changes by clicking on the Save button.

Click Cancel or Click on X to return to the previous screen.
Similarly you can work with Log a Call action to log a call with CVRTA.
Log a Call Features
- In the Activity timeline it would be visible as Call Logged.
- Due Date and Status will be captured automatically.
Other Features
- Standard Activity i.e Task, Event or Call will be created using CVRTA.
- Task or Event will be visible in the Activity timeline with all the standard features.
- You can utilise the standard Reporting tool on the Notes/Comments that you captured using CV Rich Text Area.
- You can edit content from the Activity Timeline and Task detail page.
- New Task , New Event and Log a call Fields are customizable by admin using Field Sets.
- Assigned to, Related to, Name and other default values are captured automatically.
- More tools than the standard Rich Text Area field to enrich your text.
Future Releases
- Image Upload
- Insert Table
- Feel free share to share what else would you like to be included in the app
CVRTA Guide: Custom VF and Field Set
- Create a New Field Set
Go to Setup → Object Manager → Task → Field Sets → New

Enter Field Set Label, Field Set Name and Where is this used? → Save
Drag and drop the field that is required to be entered in the New Task action and Save.

Important : Keep note of the API name of the field set created:

Create New Visualforce Page
Go to Setup → Enter Visualforce in Quick find Search → Click Visualforce Pages.
Click on the CVRT New Task to open the VF page.

Copy the Complete code from Visualforce Markup Tab. Keep it handy

Go to Visualforce Pages from Setup → Click on New → Enter Label, Name → Add description (optional)
Make sure to check Available for Lightning Experience, Experience Builder sites, and the mobile app
Paste the copied code in the Visualforce Markup tab.
Note : Delete the pretext written in the Visualforce Markup

Scroll down in the Visualforce Markup tab and Replace the Field set name in line 42 as shown with the field set API name created in Step 1
Before Code

After Code

Save the Visualforce Page.
Provide Access to VF page
Once VF Created → Go to the Security link of the newly created VF page → Add the profiles to give access to the VF page.
New VF page is now ready to create custom New Task in record pages
Repeat these steps as per your business requirement to create multiple fields sets and Visualforce pages to use in the Record Pages. There are different vf pages for each action. Use below table to copy vf page code as per the required action.