
CV Easy Lead and Contact Data Management will give the ability to manage multiple Phone Numbers, Emails, and other details for leads and contacts. You can specify the type of each Phone and Email, and also select the relevant ones as Primary phone numbers or Primary Emails.
No restriction if your prospect shares you multiple emails or phone numbers to contact. You can easily manage using this app.
With CV Easy Lead & Contact Data Management application sales reps, support agents and any salesforce user can easily organize personal information like phone and email to the related lead and contact.
Highlights
- Salesforce Native App.
- Easy to Configure and Easy to Use.
- Retains Phone/Email data with Lead Conversion as well.
- Compatible with all the Salesforce clouds, Lighting, and Classic Interface.
Installation Steps
Installing “CV Easy Lead & Contact Data Management” is easy – just click Get It Now from the AppExchange and follow the prompts to install in either Production/Sandbox (Professional Edition, Enterprise Edition, Unlimited Edition, Performance Edition).

Please enter login details of your Salesforce administrator if you are presented with the login screen.
Once you are presented with the installation screen, you are required to select which of your users should be granted access to the app including all its components.
Once you make your selection, click the Install button.

Once the installation is complete, click the Done button to return to your Salesforce org. You may see a message stating that the installation is taking a long time to complete. In this case, you will receive an email once the installation finishes.
Now CV Easy Lead & Contact Data Management is Installed in your System.
You can verify the same in the installed packages. From Setup, Search Installed Package and Click “Installed Packages” to view.
Configuration Steps
Add Phone/Email related list to your Lead and Contact page layout.

1.1 From Setup (Gear Icon), select Object Manager and select the Contact object to add the Phones/Email related list.
1.2 Click Page Layouts.
1.3 Click the page layout you want to customize.
1.4 In the list of available items in the left pane, click Related Lists.
1.5 Drag Phones and Email to the Related Lists section.

1.6 Go to Wrench icon on Phones related list and Add the columns as shown below from Available Fields to Selected Fields.
1.7 Click OK and Repeat the same steps for the Email Related List.

1.8 Click on Save.
1.9 Repeat steps 1.1 to 1.8 for Lead object.
- Map Lead Id to Contact
2.1 From Setup (Gear Icon), select Object Manager and select the Lead object.
2.2 Click on Fields & Relationships and Select Map Lead Fields.

2.3 Select Contact Tab and Match Lead Id field from Lead Fields with Lead Id from Contact Fields.

2.4 Click Save.
Create New Lead/Contact Records.
1.1 Click on the New button on the Lead object to create a new lead record.
1.2 Fill the phone/email and other details and click on Save.
1.3 Phones and Email records with Primary as checked will be created automatically as shown.

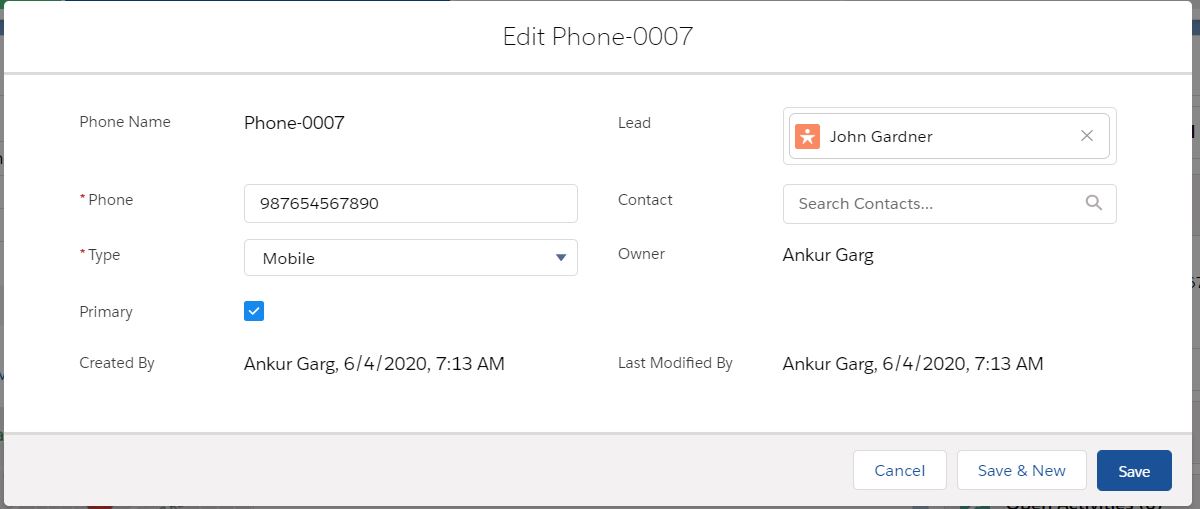
1.4 Click on the drop-down arrow next to the phone or email record and click to Edit.
1.5 You can modify the Phone record on this page.
1.6 Click to Save.
1.7 Click on drop down next to the related list and click on New button to create New Phones record as shown.

1.8 Add Phone, Select Type and Mark Primary if you need to update this Phone to the parent Lead Record.
1.9 Click Save.

1.10 You can perform similar actions for Contact records as well to edit existing Phone or Email records. Also, you can add new records directly from the related list as shown.

1.11 Once you mark any Email or Phone as primary it will get automatically update to its parent Lead/Contact record.
Convert Lead to Contact
2.1 Open any existing Open Lead Record or create new using steps given above.
2.2 Click on the Convert button.

2.3 Add necessary details to Create New contact, Account or use existing one.

2.4 Click on Convert Button.
2.5 Lead will get converted into Contact. Click on newly created Contact from the next screen.
2.6 All the Phones/Email records will automatically be captured on contact record itself to easily manage your contact.

2.7 New Phone/Email record can be created using the steps given above.
Points to Consider
- Only one Primary Email record exists for a Contact/Lead record.
- Only one Primary Phone record exists of each Type for a Contact/Lead record.
(e.g. you have one phone record of Type “Mobile” as Primary and you want to add a new phone record with Type “Mobile”. Once you save new phone record with Primary
checked then the other Mobile phone record will get unchecked automatically and new phone # will update to the Parent’s lead/contact Mobile field)
- We have validations that do not allow to unchecked primary if another phone/email record exists for a Contact/Lead record.
- Page layout/Related list may differ from the given screenshot depending on your org setting.